

This is a git tutorial that includes most of the basic usages of git commands. In details, I will introduce about git and version control, and talk about why we should use git as a Software Engineer at start. And later in this blog, there is a little exercise you can do to utilize all the git command you learned in this blog, which is also comes with step by step command and detailed explanation. For further details about git commands, check the official documentation for more detailed explanation.
introduction
If you have experienced with coding, you probably faced some situations when you found out the new change to your code makes the performance worse, or new codes added bugs that avoid the program from running. At the same time, you still want to try to add code for new features for your program. For me personally, I used to have a copy folder in my project to save temporary code. It sounds like a smart choice but actually not. Everytime I want to try adding a new thing, I need to save the whole previous files. This results my copy folder takes up too much space as it may have original size $\times$ $n$ size, which is unacceptable if there is thousand of changes. Also, it is harder to manage the code when there are thousands of changes.
history of version control and Git
A real life example of what I previous talked is Linux kernel Project. In the early stage of linux development, the developers mainly uses patches and files to pass around and updated to the repository. They switched to a scalable version control software BitKeeper to help them boost their productivity. However, their partnership ended because of their conflict about free software. Linus Torvalds, the inventor of Linux system, decides to develop their own version control software, which is widely used worldwide and been known as the topic of this article - Git.
Why do we use Git now
As a new programmer, it is really beneficial if you use git command. Just like what I said firstly, you do not need to save every change as a backup and takes space in storage. Another big benefit is that you can have a good experience with shell/console. You will face many software that comes with a CLI (Command Line Interface) when you go to industry, so it is helpful when you have experience about that. You can learn about basic bash commands and your productivity will be significantly improved.
initialize your repository
To transfer a folder to git repository, you only need to switch into your destination folder, and type the following command.
1
$ git init
After you typed this command, it will create a .git folder inside your repository, which is hidden by default. You can treat this folder as the folder that contains all the information about your git repository. The git command actually make changes to this .git folder. When you delete the whole .git folder, all the history of git is cleaned and it goes back to a normal repository.
clone the repository
This is used when you don’t have the repository in your local machine
1
$ git clone [email protected]:<username>/<repository name>.git
You can clone other’s repository to your own machines. In this case, you are a new user to this repository, any change that has on the same file will requires a merge strategy to solve the conflict. you can click here to get to know merge more.
add your code
Adding code or files in git means that you are saving your changes temporarily (staging) or you are tracking the changes of a new file. This step itself is in between previous commit point and next commit point. You can reset to the previous stage or commit to next stage.
1
2
$ git add <file> # add some specific file that you changed
$ git add -A # add all changes
check status of your changes
If you already did some git add command previously and you are wondering what files have been changed, you can use following command to check which file(s) has been changed.
1
2
$ git status # get a detailed status information
$ git status -s # get a short status info
check difference of your changes
After you have checked the status of your git repository, you still want to know what exactly has been changed. Then, The following command will gives you a detailed information of what has been changed.
- The details is about change of lines as the
git diffcompares the changes of lines. ---means what has been deleted.+++means what has been added.1
$ git diff
commit your code
After you have already add some file changes to the git, you still need to commit the changes as one big change with your commit message. This message usually tells about what functionality is developed with such a code change. It can also be many other action like fix bugs or merge with other branches.
In the message, it is better to use format ”<action> <what you did> in <section name>” example: “add model fitting in training section”
1
$ git commit -m "the message for this commit"
push your code to remote git repository
Pushing your code means that you are syncing your changes to the remote repository. It includes all the changes you did using git such as commits. However, be caution with this operation as it can be much more complex when multiple people has contributed code to the same remote repository. In this case, you are required to know how to solve the conflicts before you push it. Worst case is that you may lose your code FOREVER!!!
general push
This is the easiest way to push your code. It will try to push your commits and changes to remote HEAD by default. If it fails, there may be several possible situations
- no upstream been set for new branch
- solve: check here
- conflict
- Under construction…
1
$ git push
- Under construction…
push a new branch
If you have created a new branch but did not push it to the remote repository at all, your push request may not be successful when you try to push your changes in this new branch. This is because you did not give a “direction” of where this local HEAD should pointed to. You can use the following command to solve the issue.
1
$ git push --set-upstream origin <branch-name>
By adding --set-upstream to origin/<new-branch-name>, you are referencing a point to your local HEAD. Thus, you can see that there is a connection being established between local and remote for this new branch.
use pull/fetch to update code
The pull command is like an opposite to git push as it pulls new code from remote repository to your local repository. However, be caution before you use pull as there may be conflict if you already have changes committed in you local repository but the remote is also changed.
There are two useful git command to pull code, which are explained below:
fetch code from remote repository
As it stated in the name, it fetches code from remote repository first. However, it does not changes what you already had in your current working repository as you can treat it as downloading the new code but not implementing them. The options for git fetch are mostly related to how much to retrieve and where to retrieve the code and files.
1
$ git fetch
pull code from remote repository
Pulling code is relatively is like a combination of git fetch and git merge as it will get the new code from the remote repository and try to merge/rebase it with local files. I would suggest to use rebase option when merging, as it does not include unnecessary commits.
1
2
$ git pull
$ git pull --rebase
Save your code temporarily by using git stash related commands
If you want to try something new but you have no guarantee that will work, you can use stash to save your current work and go back to a clean working tree and try something else. After that, you can get your code if you need to use your temporary code you wrote previously.
stash your code temporarily
It will store your current changes along with current index and meta information.
1
$ git stash
list your stash info
Use list option to display what previous stash you had
1
$ git stash list
show the changes of your stashed file
Use show option to check what have been changed with your stashed file.
1
$ git stash show
restore your updated code
Use apply option to restore the stashed changes by applying the stash.
1
$ git stash apply
reset your current working space back
Reset is used more when you do not what to store your current changes and want to restore to last commit point. It can also be used to go back to any of the commit point previously made.
--hardmeans that discard all changes and reset the repository to last commit point/or specified commit point.--softmeans that going back to the specified commit point and all the commit points breaks down to changes.
1
2
$ git reset --hard
$ git reset --soft
merge code for different situations
In git pull section, we talked about auto merge when there are updates from two different sources. This is what merge is in git. It can happens in many situations, like merging two branches or combining updated code. An example of this is when you already implemented a new feature in another branch, and you want to copy that feature to main branch. In this case, you need to checkout the main branch, and use the following command to merge <branch-name> with main.
1
$ git merge <branch-name>
Different merge situation
- If the source has a new file, merge command will add this new file to target branch.
- If the source has deleted some files, merge command will delete these files to target branch.
- If there are new changes on the same file of both source and target branch, there is a conflict happens and the merge process is aborted. What happens is that it will generate the file with all the changes, you need to select which part the leave and which part to get rid of. After all the changes have been clarified, you need to commit the changes and the merge process is then completed.
branch operation
The branch option is probably the reason why git and version control are so popular nowadays. If you try to implement a new feature without interfere what code currently have, you would probably just create a copy of that code and do the testing on the copy. This is what basic idea about branch operation. Instead of creating another copy, Git will document what you have changed in another branch. If you want to switch to another branch, Git will just compare the difference of the code and move around the code to match the target branch. So it is an efficient way as it does not have copy for duplicated code.
create a new branch based on current branch (usually main)
By creating a new branch from existed branch, you can treat it as make a copy from that branch. Before doing that, make sure you have already switched the correct source branch. Then you can directly perform the following command to create a new branch.
The new branch is created locally. If you want to push the new branch to remote repository, check this section about how to push new branch
1
$ git branch <new-branch-name>
switch to different branch
From last step, you have already created a new branch. However, you can check that you are still in the previous branch by using git branch. You need to use the following command to switch to the branch you want. This allows you to switch between different branches.
If you want to create a new branch and switch to it immediately, you can use the following command
$ git checkout -b <new-branch-name>
1
$ git checkout <branch-name>
Renaming
There are several steps to rename the repository
1. renaming in github settings
If you are using github as the remote git repository platform, you should go to Settings of your repository and rename your repository in the General section. It should looks like this: 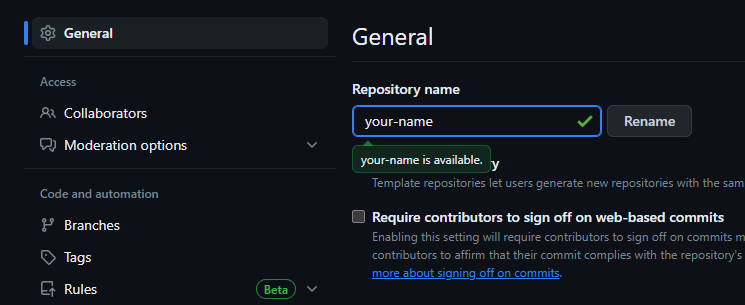
2. renaming local repository
Update the name of your local repository to match with the new name
1
$ mv <old-name> <new-name>
3. check old url
Check the upstream/downstream url which should looks like this:
1
2
3
$ git remote -v
origin  [email protected]:<username>/<old-name>.git (fetch)
origin  [email protected]:<username>/<old-name>.git (push)
4. update upstream/downstream url
1
$ git remote set-url origin <new-url>
You can check if the urls have been updated successfully by using the git remote -v command from last part. It should looks like the following snippet:
1
2
3
$ git remote -v
origin  [email protected]:<username>/<new-name>.git (fetch)
origin  [email protected]:<username>/<new-name>.git (push)
Something to check before you start any of the steps below
1. temp file discarding
Make sure your repository do not contain auto generated files by other softwares like .vscode folder. If you have any folders or files like that, you need to add the full name to .gitignore file. For example:
1
2
# Discard vscode file
.vscode
2. Conflict handling
Make sure you know how to deal with code conflict. Since we all editing the same file main.ipynb, git will give us a conflict warning and stop our operation. use stash or merge to solve any issue
difference between similar git commands that may mislead you
git switch/checkout
Under construction…
git stash/reset
Under construction…
Exercise
Under construction…